Table of Contents
FDM Training SOP
Last edited: Haley Holcomb (08/26/22)
Tool Lead: Jason Wei & Andrew Furst
Contact: jwei@ucsb.edu & Andrewfurst@ucsb.edu
Ultimaker Printers
Training Checklist:
- Components Overview: thermoplastics, extruder, print head, print cores, build plate
- Safety: hot printheads & bed, moving components
- Job Setup
- At the computer: CAD → export .stl → Cura (print parameters, support materials) → export .gcode/.ufp → USB stick → plug into printer → record in FBS
- At the printer: clean print bed
- Part Removal Cleaning
- Scraper, cold water rinse, warm bath support removal process
- Rates
Safety Concerns
- Both print heads and bed are heated during operation. Do not attempt to clean, remove, or adjust without allowing for adequate cool down time.
- Keep hands clear of printer during operation. Pause print before clearing or adjusting print.
Common Mistakes
- Inadequate part adhesion to the bed - can cause print failure or breakage of entire print head assembly
- Can be prevented with proper bed cleaning, use of hairspray, bed adhesion print settings, and high enough printing temperature
- Not drying PVA (can apply to PLA as well) dissolvable support material for at least 10 hours prior to print - can cause PVA to stop extruding during a print, resulting in print failure
Safe Operating Procedures Review
- Launch Cura version 5 (dark blue icon)
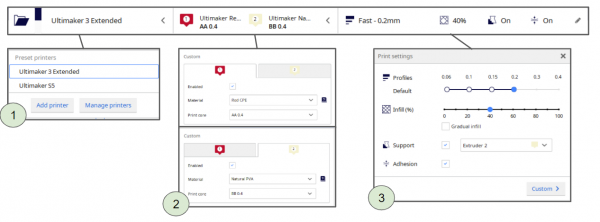
- Select printer and material(s) (ensure material is under 'Ultimaker' material section) on top selection bar
- Select File → Open Files → Open desired project (.STL file type)
- Using task bar on the left hand side, position model as desired
- Under print settings, reset all print settings to default by → going to custom tab → open Profile drop down menu → select desired slice height → open Profile drop down menu again → select “Discard current changes” (if greyed out and not selectable, then the settings are already default)
- Switch back to “Recommended” print settings for ease of use
- Adjust infill percentage and support
- Support can be generated using ether nozzle, typically nozzle one holds build material with nozzle two printing with dissolvable support material
- PVA support material needs to be dried in PrintDry container for at least 10 hrs prior to printing
- Ensure “Adhesion” is selected
- Save the .gcode (file type Ultimaker 3 uses) or .ufp (file type Ultimaker S5 uses) file from Cura to a USB drive
- Select “PREVIEW” tab on top of screen to preview print
- Specific layer cross sections can be viewed by adjusting slider to the right of screen
- Remove glass build plate (pull open clips first), bring to fume hood #3 (spray booth)
- Spray build plate with IPA and wipe off with paper towel
- Spray thin layer of hairspray on build plate to ensure bed adhesion
- Reinstall build plate into printer (secure using clips)
- Connect thumb drive to printer → select desired file → select print
Note: If adjusting advanced print settings, please do so after creating a separate/duplicate print settings profile (do not change default print setting profiles). Adjusting settings may lead to more (OR LESS) successful prints. Contact Workshop Wizard responsible for Ultimaker if print fails or knowledge of advanced settings is desired.
Post Processing
- Remove part from print bed using a scraper (if part is too hard to remove, remove print bed and rinse part under cold water for 20 seconds)
- If support was constructed from ABS carefully break away with pliers
- If support was constructed from PVA soak part in warm water for several hours to dissolve support structure
Part Removal and Cleaning
- Remove part from print bed using a spatula or razor being careful not to cut yourself or scratch the build plate. Make sure no body part is in line with the tool should it slip or the part break free unexpectedly.
- If support was used, submerge print in warm water for several hours to dissolve PVA filament. (prints can warp if submerged in water for over 24 hours)
Maintenance
- Bed should be cleaned with IPA between prints
- Print heads and silicone head protector should be cleaned with IPA using a brush as needed
- Print cores should be swapped or purged after clog or to change print line width.
Additional Information
Cura Model Settings
- Move: Allows you to move your model across the plane in the x-, y-, and z- direction
- Scaling: Allows you to scale your model in the x-, y-, and z- direction by a percentage amount
- Rotation: Allows you to rotate your model. Make sure to select the face that you want to align to the print bed. Ensure that you align the face with the greatest surface area.
- Mirror: Allows you to mirror your model.
- Per Model Settings: Allows you to change print settings for each model. This allows you to have multiple prints on the same build plate while still using different print settings for each model.
- Support Blocker: Allows you to prevent support from being generated in certain areas.
- Print selected model with Extruder 1: Select which model to print with Extruder 1. This is generally build material.
- Print selected model with Extruder 2: Select which model to print with Extruder 2. This is generally support material.
Cura Print Settings
- Printer Type: Choose Ultimaker 3 or Ultimaker 5 Extended.
- Material Type: This allows you to choose the material type you have loaded into the printer. Ensure that both the material type as well as the printhead diameter settings match the printheads on the printer
- Layer thickness, infill, support: Allows you to adjust the thickness, infill, and support you wish to use. Ensure that you enable adhesion
Troubleshooting
Critical Printer Problems
- Material is not extruding or under extruding
- Ensure printing temperature is correct
- Material could be too moist and needs to be dehydrated in PrintDry chamber overnight
- Solution to - error message of “one material seems to be empty”
- Whenever installing/reinstalling filament, ensure that there are no deep bite/gouge marks on the filament. This will cause extrusion failures
- Print core could be clogged - try using another print core and inform a staff member of clogged print core
- For staff - instructions for print core purge
- Ultimaker’s purge wizard does not work too well, what follows is a better custom recipe:
- Set clogged print core temperature to 230C
- Remove filament & filament tube from print head (use pliers to push down the tube collar fitting & pull out the tube at the same time)
- Insert clear purge rod into the print core through the hole that filament would usually go, and push down using pliers until it can no longer be pushed down or until clear material exits the nozzle
- IF clear purge rod cannot be pushed down further
- Reduce print core temperature to 130C then pull OUT purge rod
- Repeat above all of the above instructions (heat, push in rod, cool, pull out rod) until clear material can be seen exiting the nozzle
- IF/WHEN clear material can be seen exiting the nozzle, print core purging has been completed
- Reinstall filament tube & filament and proceed with print job
- Extruded material is not sticking to the print bed
- Clean bed with IPA and spray a thin layer of hairspray prior to printing
- Support material not extruding in the correct x-y position during dual material mode (PVA overlapping build material when it is not supposed to)
- X-Y offset needs to be calibrated - inform a staff member
- Error message of “there is a problem with the active leveling sensor”
- Ensure there is no debris between glass bed and aluminum plate
- Print bed needs to be manually leveled - inform a staff member
- Large clump/ball of material surrounding nozzle
- Stop print and inform a staff member
Print Quality Problems
- Edges/corners of part are warping (lifting off of the build plate, common for ABS prints)
- Adjust print orientation to reduce bottom layer surface area
- Clean bed with IPA then spray thin layer of hairspray prior to printing
- Decrease fan speed of bottom layers (custom settings)
- Bottom layer of print is wider than the rest of the print (aka elephant foot)
- Decrease bed temperature
- Brim is hard to remove from part
- Increase brim distance (custom settings) by 0.1-0.2mm
- Decrease bed temperature
- Overhangs are droopy
- Increase fan speed, decrease print temperature, and/or consider using support
- Tiny holes on surface of print, part appears flimsy - print core is under extruding
- Use freshly dried filament
- Ensure print temperature is correct
F270 Printer
Training Checklist:
- Components Overview: thermoplastics, extruder, print head, print cores, build tray, material wells
- Safety: NaOH bath
- Job Setup
- At the computer: GrabCAD, print parameters, record in FBS
- At the printer: build tray
- Part Removal Cleaning
- Tray removal, Sodium hydroxide solution cleaning process
- Rates
- ABS, Support, hourly charge
Overview:
- This training provides an introduction to using and operating the Stratasys F270:
- File Types
- Software
- GrabCad Print
- Printer Use
- Post processing
- Prints with ABS
- Work by extruding thermoplastic filament onto build platform-Build the part layer by layer.
- Remember to enter job information into the 3D print job log!
Safety
- As with any automated machinery make sure that your body is clear of the moving parts to avoid injury.
- The support removal tank is filled with heated caustic chemicals that dissolve the support material. An apron, Gloves, and a face shield must be worn when inserting and removing parts or basket from tank.
Job Setup
- At the Computer:
- Load your STL file into GrabCAD on the computer adjacent to the printer
- Set Print Parameters:
- Position the part on the build tray in a way that is conducive to 3D printing (flat side down, minimize overhangs etc..)
- Select appropriate layer or slice height (the more slices the higher the print resolution but the longer it takes to print)
- The printer will print a raft before printing the model. Make sure first layer is set to support material or removal will be incredibly difficult.
- Send job to F270 over Ethernet
GrabCad Print overall Model Settings
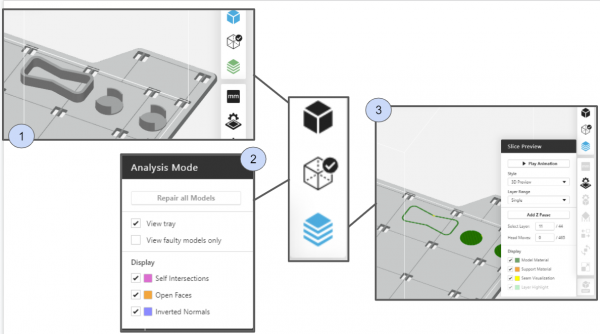
- Overall view: When you upload your print, this shows your overall model.
- Analysis Mode: This shows any errors detected in your print. To repair these errors, hit “Repair all models”
- Slice Preview: This setting allows you to inspect each layer of your print. You can choose which material to display. You can also add a Z-pause between layers, which allows you toswap material colors mid-print or add an insert.
GrabCad Print Model Settings
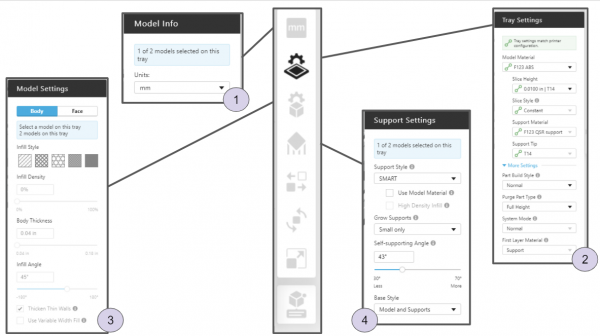
- Model Info: Allows you to select individual components of your print and adjust the units (mm, cm, etc.) of your print.
- Tray Settings: Adjust build and support material, slice height. In this setting, it is critical to ensure that the first layer is support material, NOT build material. If build material is used instead, the tray will be ruined.
- Model Settings: Adjust infill, body thickness, infill angle.
- Support Settings: Further adjust support style.
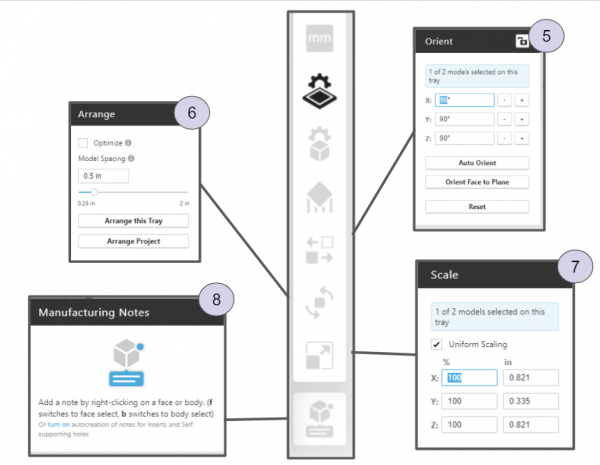
- Orient: Move model around the plane. In this setting, you can orient a face to the plane, which should be the face with the greatest surface area.
- Arrange: Adjust model spacing.
- Scale: Allows you to scale your model.
- Manufacturing Notes: Right click a face or body to add a note.
Make sure to record the material used and print time in FBS along with the other job information requested.
- At the printer:
- Make sure that there is enough room on a CLEAN build tray for your part, and that the build tray is secured in the printer with the locking arm horizontal. Build trays may be used until the entire build area has been printed on, but printed areas should ideally not be reused.
- Start the job at the printer
Post-Processing
- Remove and flex the build tray to break the parts loose from their support
- Use a spatula to clean the build tray for the next job
- Don gloves, face shield, and lab coat
- Carefully, slowly and without splashing cleaning solution open the support removal tank lid, remove and open the tank
- Place large parts directly in the tank, small parts may be put in the SS box and placed into the main basket.
- Carefully, slowly and without splashing lower the basket back into the tank and close the lid.
- Set timer for 6 hours setting the temperature to 80 degrees C.
- After cleaning time has elapsed follow the instructions above for opening and removing parts.
- Rinse part in warm water
Rates
F270:
| Material | $/Spool | cu in/Spool | $/cu in | $/cc |
|---|---|---|---|---|
| PLA | 79 | 60 | 1.31 | .08 |
| ABS | 164 | 60 | 2.73 | .17 |
| Sup | 228 | 60 | 3.79 | .23 |
F270 hourly charge: $1/hr to pay for head replacement
Ultimaker: ABS: .12/gram


