User Tools

Site Tools


miter_saw_sop

Miter Saw Training SOP

Last edited: Furst (11/25/20)

Instructor:

Date:

Attendees:
Name Group or Company Signature
1
2
3
4
5
6


Overview:

  • This training provides an introduction to using and operating the Festool miter saw including:
    • Safety
    • Approved materials
    • Saw Set up
      • Setting up the Saw
      • Securing and positioning the workpiece
      • Setting feeds and speeds
    • Making a cut
    • Saw Maintenance
      • Changing blades
  • The Miter saw is a great tool for cutting precise angles in wood, plastic, and aluminum. The saw has two angle adjustments, one in the head, and the other in the fence to orient the workpiece precisely in relationship to the saw blade.

Safety

  • Safety glasses or a face shield must be warn at all time when operating the saw
  • Hearing protection is recommended for all operating tool and in adjoining lab (2442)
  • Machine tools should never be operated alone, be sure to always run machine tools supervised or with a Workshop Wizard present
  • Only cut one workpiece at a time
  • Be sure workpiece is properly secured
  • Hands should be kept free and away from the blade at all times
  • Do not attempt to clear workpiece until blade guide has returned to its original position and the blade has stopped spinning

Approved Materials

  • Wood
  • Plastic
  • Aluminum
  • Brass
  • Copper
  • Fiber cement panels

Prohibited material

  • Steel
  • Ferrous metals
  • Concrete
  • Mineral materials

Saw Setup

The Miter saw is designed to be plugged into the Festool dust collector. By setting the dust collector to auto and hooking up the dust collection hose, the dust collector will automatically turn on when the making a cut.

Setting up the saw

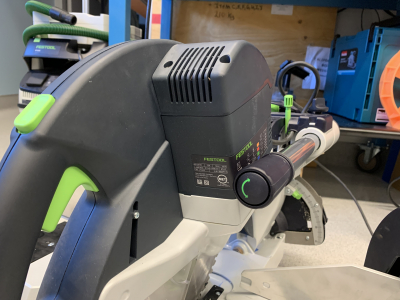
  1. Adjusting blade tilt
    1. Rotate knob protruding from the right overarm to tilt the head assembly and blade
  2. Adjusting fence rotation
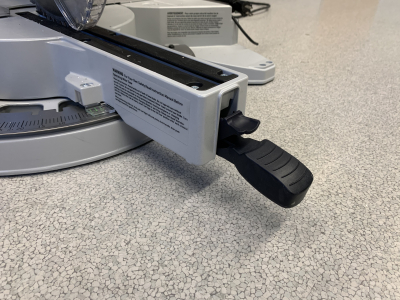
    1. Lift the lower lever protruding from the front of the blade guide to release the brake
    2. Depress the smaller thumb lever above the brake lever to allow the fence to rotate
    3. The thumb lever will lock into detents at 15, 25, and 45 degrees (other angles can be achieved between detents)
    4. Lower the brake lever to lock the fence rotation in position

Securing the workpiece

  1. Pull the green head lock lever to raise the saw head and blade
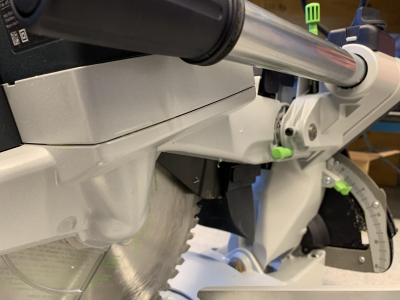
  2. Position the workpiece pressed firmly against the fence making sure it is supported on both ends if overhanging the saw body
  3. The fence can be adjusted slightly if necessary
  4. Lining up the cut can be done with the laser guide (button on top of articulating head)
  5. Using external C-clamps secure the workpiece against the fence and resting on the saw body
  6. Clamps should fully secure the workpiece before and after the cut. Be aware on how the center of gravity of the workpiece will change as it is cut if dealing with a long workpiece.

Setting feeds and speeds

  1. Adjust the saw speed based on the workpiece material and chart located on the right side of the head
  2. Feed should be slow and constant throughout the workpiece and require very little cutting pressure. The saw should not bog down under load during a cut.

Making a Cut

  1. Don all appropriate PPE including eye and hearing protection
  2. Notify users in 2448/2442 and close adjoining door
  3. If extended cut length is needed loosen the locking knob located above the right over arm support. This allows the head to extend towards the operator.
  4. With hands clear of the workpiece and blade, use the thumb to depress the safety, pull the trigger to start the blade spinning
  5. If overarm extensions are being used draw the saw to its full extension before lowering the blade into the cut
  6. Slowly and consistently lower the blade into the cut. The blade shield will automatically expose the blade to the workpiece
  7. If overarm extensions are used lower the blade into the cut at full extension and push the blade back to its initial position after lowering it to full depth of cut
  8. Once the cut is complete raise the blade out of the cut before releasing the safety and trigger
  9. The blade shield will automatically cover the blade
  10. Allow the blade to come to a complete stop before attempting to remove or clear the workpiece

Maintenance

Changing Blades

  1. Unplug the saw and unhook any vacuum attachment
  2. Loosen the plastic protective guide blocking the saw arbor screw (3mm)
  3. lock the saw arbor in position by rotating the green knob on the head clockwise
  4. Using a 6mm hex wrench loosen the saw arbor. KEEP IN MIND THIS IS A LEFT HAND THREAD
  5. Squeeze the trigger to release the blade shield and remove the retaining bolt and assembly along with the blade
  6. Replace the blade insuring the teeth will cut as the blade rotates clockwise
  7. Retighten the retaining bolt and assembly keeping in mind that this is a left hand thread
  8. Reposition the plastic protective guide and tighten into position

Miter Saw

Tool Lead:
Contact: andrewfurst@ucsb.edu

Safety Concern

  • Safety glasses or a face shield must be warn at all time when operating the saw
  • Hearing protection is recommended while operating the saw and for users of adjoining lab
  • Only cut one workpiece at a time
  • Be sure workpiece is properly secured
  • Hands should be kept free and away from the blade at all times
  • Do not attempt to clear workpiece until blade guide has returned to its original position and the blade has stopped spinning

Approved Materials

  • Wood
  • Plastic
  • Aluminum
  • Brass
  • Copper
  • Fiber cement panels

Safe Operation Procedures Review

  1. Hook up saw power through Festool dust collector and set the collector to “auto”
  2. Using the knob on the right overarm support and the two levers on the fence set the angles on the blade and workpiece
  3. Using clamps secure the workpiece square against the fence
  4. If cut necessitates the use of the sliding saw head loosen the knob located above the right overarm
  5. Depress both the thumb safety and the trigger to start the saw and dust collector
  6. Once the blade has reached speed extend the saw to its maximum over arm extension before lowering the blade into the cut
  7. Once in the cut push the blade into the workpiece until cut is complete
  8. Remove the blade from the cut before releasing the trigger
  9. Allow the saw to come to a complete stop before reaching to clear workpiece

Maintenance

Switching Blades Unplug the saw and unhook any vacuum attachment

  1. Loosen the plastic protective guide blocking the saw arbor screw (3mm)
  2. lock the saw arbor in position by rotating the green knob on the head clockwise
  3. Using a 6mm hex wrench loosen the saw arbor. KEEP IN MIND THIS IS A LEFT HAND THREAD
  4. Squeeze the trigger to release the blade shield and remove the retaining bolt and assembly along with the blade
  5. Replace the blade insuring the teeth will cut as the blade rotates clockwise
  6. Retighten the retaining bolt and assembly keeping in mind that this is a left hand thread
  7. Reposition the plastic protective guide and tighten into position
miter_saw_sop.txt · Last modified: 2020/12/21 01:19 by furst