
laser_cutter_training_sop
Table of Contents
CNSI Trotec Speedy100 Safe Operating Procedures
Last Updated: 7/17/23 Rachel
This SOP is compiled from the following sources. For more information reference these sources.
Training Checklist
- Safety Considerations: high fire hazard, prohibited materials
- Materials
- Allowed Materials
- Prohibited Materials
- Mounting Materials in the bed: honeycomb bed
- Cutting
- Troubleshooting
- General Material Recipes For Acrylic
- Thickness, engraving settings, cutting settings
- Ask wizard for assistance creating new material recipes
Location
The Trotec Laser printer is located upstairs in Elings 3430 next to the Haas CNC machine in the back of the room.
Overview
- This training provides an introduction to using and operating the laser cutters including:
- File Types
- DXF
- PDF
- Software
- Job Control
- Corel Draw
- Safety
- Fire hazard
- Material composition
- Laser Cutter Use
Safety Considerations
This laser engraving system contains a class 4 carbon dioxide (CO2) laser that emits intensive and invisible laser radiation. Without safety precautions the direct radiation or even diffuse reflected radiation is dangerous!
- Always wear safety glasses when using the machine.
- Always work with the machine cover closed.
- NEVER leave the laser machine alone when running a job. If you do need to leave,
- The machine door must be left open while you are away.
- Do not store any flammable materials in the inside of the device or in the immediate vicinity of the device.
- Remove leftovers of previously produced materials before running a job.
- A fire extinguisher/fire blanket must always be handy as the laser beam can ignite flammable materials.
- Metals, particularly un-coated aluminum, copper, silver and gold, cannot be processed with the laser and lead to high reflections of the laser beam. If needed, metals can be coated with a paint/tape which chemically bonds to the surface when engraved.
- Before processing materials the user must verify whether harmful materials can be generated and whether the filter equipment of the exhaust system is suitable for the harmful materials.
- PVC (polyvinyl chloride) must under no circumstances be processed with the laser.
- Looking directly into the laser can cause retinal damage.
- Confirm that the fume collection system is running whenever the laser is cutting or engraving.
Material
Always check materials list BEFORE attempting to cut/engrave a material. If unsure contact IW Staff.
Allowed Materials
Plastics:
- ABS (acrylonitrile butadiene styrene)
- Acrylic (also known as Plexiglas, Lucite, PMMA)
- Delrin (POM, acetal) — Must use nitrogen assist when cutting delrin
- Kapton tape (Polyimide)
- Mylar (polyester)
- Nylon (melts badly)
- PDMS
- PETG (polyethylene terephthalate glycol)
- Polypropylene (PP) — melts somewhat
- Styrene
- Two-tone acrylic — top color different than core material
Foam:
- Depron foam (often used for RC planes)
- EPM
- Gator foam (foam core gets burned and eaten away compared to the top and bottom hard shell)
Other:
- Cloths (leather, suede, felt, hemp, cotton)
- Magnetic Sheets
- Papers
- Rubbers(neoprene, etc supplier try: mcmaster.com)
- Woods(MDF, balsa, birch, poplar, red oak, cherry, holly, etc. supplier try: midwestproducts.com)
Prohibited Material
- Metals (our laser cutters are not powerful enough nor setup to cut through metals and attempting to do so could damage the machine)
- Metals (cannot be engraved however a certain type of paint/tape which chemically bonds with the metal may be used to mark materials)
- Polycarbonate (PC, Lexan) — Lexan creates large amounts of fumes
- Teflon (PTFE, Polytetrafluoroethylene) – cutting creates Fluorine gas
- Any material containing chlorine
- PVC (Cintra) — contains chlorine
- Vinyl — contains chlorine
- HDPE: “milk bottle” plastic. It gets gooey, melts and catches on fire.
- Epoxy
- Glass — you can engrave glass, but trying to cut it will cause cracking or breakage
- Fiberglass
- Printed circuit board (FR4 and other material types)
- Carbon Fiber
Cutting with the Trotec Laser Cutter
- Turn the printer on with the power switch in the left back corner. Allow the printer to initialize, the bed will go to the bottom position.
- Place material on bed. Larger parts should be placed over the honeycomb bed but, if your part is too small, you can lower the bed, remove the honeycomb barrier, and secure a piece of acrylic to the bed with magnets to place your part on top of.
- Focus printer on material by using the focusing tool. Place the focusing tool on the edge of the laser head and raise the bed until the tool either touches the material or falls off.
- If cutting very thick material(>1/4in) you must focus to the center of the material. This can be done by focusing to the top of a material of half the thickness.
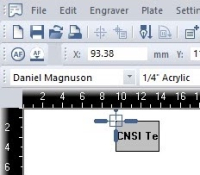
- Open CorelDraw and upload your .DXF or .PDF file using the folder icon in the top left corner. Alternatively, you can use CorelDRAW to outline your cut.
- Set the size of the drawing to the size of the bed: 24” x 11.99”.
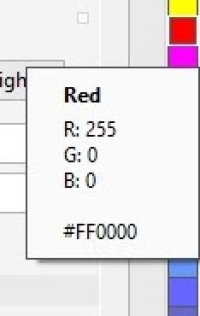
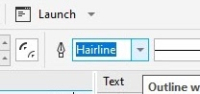
- Features being cut should be in RGB Red and set to “hairline” thickness. Features being engraved should be RGB Black. When dragging a color over from the right hand menu, a solid-colored box will indicate that the entire shape will be filled with that color and a colored square outline means that only the outline of the shape will be colored.
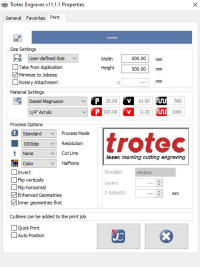
- Select print and click on the print setting button.
- Choose the correct material properties from the menus
- New material recipes can be created in Job Control
- Make sure that “minimize to jobsize” and “cut inner geometries first” are selected.
- Click the JC (job control) button.
- Make sure that “Print to file” and “Single file” are selected and then click print. Save your file to the desktop.
- Job Control will now open. Ignore any “empty” error messages. Drag your file from the jobs menu on the right hand side to the preview plate on the left. Connect to the printer by clicking the USB icon.
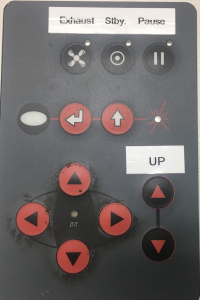
- Position the laser on your material where the upper land corner of your cut will be by using the directional arrows on the machine.
- The crosshairs in Job Control indicate the position of the laser on the bed. Make sure the zoom is set to “Fit to plate”. Drag the icon of your drawing in the preview plate so that the upper left corner is at the crosshairs.
- Double check material properties and that the recipe is correct
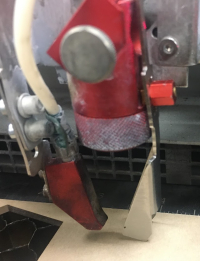
- If you want to use Nitrogen instead of air for the air assist, turn both valves on the right back of the printer to Nitrogen. Make sure you turn off the Nitrogen regulator valve after each print as to not waste Nitrogen.
- You can outline your job on your material with the laser pointer before you make your cut by right-clicking the icon of your drawing in the preview plate.
- If everything is OK, click the play button and your part will begin to print.
- YOU MUST NOT LEAVE WHILE PART IS BEING CUT AS FIRES COULD OCCUR
- Once the print has been completed, open the lid, lower the bed and remove the part. Make sure all pieces of material are removed from bed.
- Turn off the printer and close the lid. The computer should be left on.


Troubleshooting
- If JobControl will not allow you to drag your file onto the build plate, either “minimize to job size'' were not checked, or your build plate dimensions are bigger than those of the Trotec bed size
- Double check that your drawing is 24” x 11.99” in CorelDRAW
- In Job Control, go to the “plate” dropdown menu, “plate setup”, and make sure the plate is set to 24” x 11.99” and “fit to plate” is selected.
- Make sure that cuts are hairline thickness.
- If the PC will not connect to JobControl after clicking the USB button try restarting JobControl or turning the printer off and back on after 5 sec.
- If the jobs menu disappears from the right side of Job Control, you can get it back under the “view” dropdown.
General Material Recipes For Acrylic
| Thickness | Engraving Settings | Cutting Settings |
|---|---|---|
| 1/16“ | 50% power, 25% speed | 100% power, .6% speed |
| 1/8” | 50% power, 30% speed | 100% power, .45% speed |
| 1/4“ | 50% power, 30% speed | 100% power, .2% speed |
General Kerf Width For Acrylic
| Thickness | Kerf Width |
|---|---|
| 1/16” | .001“ |
| 1/8” | .0065“ |
| 3/16” | .085“ |
| 1/4” | .0056“ |
laser_cutter_training_sop.txt · Last modified: 2024/09/30 20:03 by kho