
Table of Contents
Haas Super Mini Mill Training SOP
Last edited 1/4/23 Haley
Instructor:
Date:
| Name | Group or Company | Signature | |
|---|---|---|---|
| 1 | |||
| 2 | |||
| 3 | |||
| 4 | |||
| 5 | |||
| 6 |
Overview:
- This training provides an introduction to using and operating the Haas CNC mill including:
- Software
- Solidworks
- HSM Works
- File Types
- G-Code
- .EGC
- Choosing tools and related feeds/speeds
- Setting up a job
- Machine Limitations
- Machine Maintenance
Safety
- Safety Glasses must be worn when machine is running
- The glass doors must be in closed before starting a job
- The spindle must be completely stopped before adjusting or removing work piece or tool
- After milling is completed, the work piece will have developed sharp burrs which must be removed with a hand file or sandpaper
Software
CAD:
Due to its industry prevalence, this SOP will focus on and assumes a base knowledge of Solidworks. Users taking this training should have taken ME-12S or have comparable machining knowledge.
CAM:
Once the design is complete Solidworks can be used to create the toolpaths, however this SOP will focus on HSM Works due to its integration within Solidworks, more complex feature set, and industry wide use. HSM Works is installed on any Innovations Workshop computer running Solidworks 2020 including the Ultimaker, Carbide 3D computer and Innovations laser cutter computer. Many toolpaths will likely be necessary to create the CAM needed to machine the part. To generate the toolpaths:
- Select the CAM window from within the Solidworks Command Window (note that CAM is an HSM Works plug in and is different from Solidworks CAM and Solidworks CAM TBM and will not appear unless HSM Works is installed on the computer)

- The Command Window will now show HSM Works functions
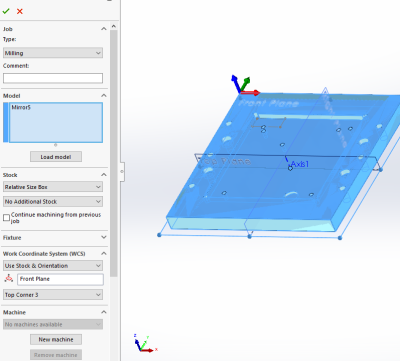
- Select “New Job” to specify desired part to machine, define size of raw stock, and indicate the part zero and work holding coordinate system.

- Typically the back left corner is used for part zero as shown
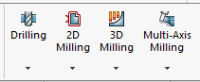
- Select the first desired machining operation from the 2D or 3D machining drop down
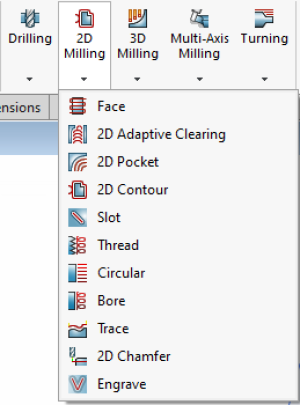
- The 2D machining drop down is used for many 2D operations including slotting, facing, pocketing, and chamfering
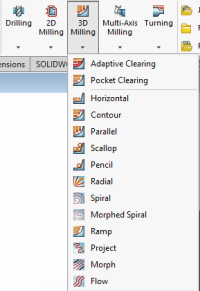
- The 3D operations can do 2D machining operations such as adaptive pocket clearing, however it is typically used for adaptive clearing or machining requiring all 3 axis simultaneously
- 2D and 3D operations require many of the same input perimeters including
- Tool and cutting rate
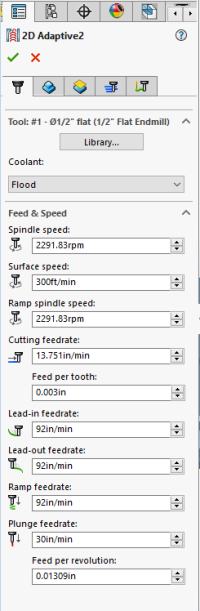
- Tools can be selected from the “all” category of the tool library based on desired tool and modified using the edit button if necessary to set number of flutes and sickout /geometry of tool and tool holder
- Selecting a tool automatically generates generic feeds and speeds for a much more ridged machining center. Feeds and speeds should be set based on the provided chart under references
- Desired machining geometry
- Simply select the desired face or feature to machine in the current operation.Toggling off Z propagation and tangent propagation can be used to select smaller or partial features.
- If this operation is finishing machining a feature based on the previous operation check “rest machining” and input the second tools diameter
- Cutting/retract heights
- Typically selecting machining geometry will set many of the heights automatically, however they can all be altered if necessary
- Machining passes
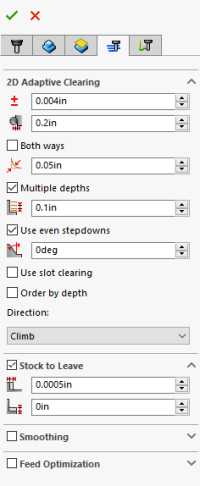
- Part of feeds and speeds, HSM Works will auto fill many of the boxes, however due to the limited power and rigidity of the machine, stepdowns should be reduced based on the reference material and “multiple passes” should be used to reduce cutter load
- “Material to leave” can be adjusted to create roughing passes if desired. Many operations such as adaptive clearing will automatically leave stock as it is assumed to be roughing operations.
- Linking
- Linking moves dictate how the cutter enters and exits the workpiece and can be altered to prevent the cutter from running into the stock while it attempts to start or finish a cut cleanly.
- Simulating
- Any toolpath generated can be previewed using the simulate function built into HSM Works. the Job or single operation can be selected before selecting “simulate” from the Solidworks command bar.
- Simulating code is a great way to see unwanted movements the tool may make or seeing if the tool is undercutting into important areas of the stock or crashing into the workpiece.
- Within simulation “stock” can be triggered on and off to see material removal in real time.
- Posting
- Post the code by selecting Post Process and selecting Carbide 3D (grbl) as the post configuration. The program name or number should be numbers only, and is typically notated 00001 (not necessary for carbide but good practice for larger machines) make sure to select the desired output folder as by default Solidworks buries the G-code


Setting up the Haas Mill for a Job:
The Haas CNC mill uses big boy CT 40 taper tools to hold anything from ER 32 collets to drill chucks and work piece probes. Gripping range is basically anything you can imagine machine with this tool all the way up to 1“ shanks. Tool 1 is typically set up with a 1/2” endmills and tool 8 with a Renishaw tool probe.
Changing tools:
- Select MDI mode by pressing the MDI/DNC button once
- Using the ATC forward and ATC reverse buttons bring the desired tool into the spindle
- HOLDING THE TOOL HOLDER that is in the spindle press the ATC release button or the black button located on the machine head inside the machine
- The tool should release with an accompanied air purge to clean the spindle tapers
- Using the CAT 40 tool tightening fixture in a vice, secure the tool holder insuring to close the lever containing the second spindle dog
- Using a spanner or a box wrench carefully loosen the collet nut or tool clamping mechanism
- Before replacing the cutting tool insure all collet tapers and tool shanks are clean and free from dust or chips. Wipe with a clean paper towel before installing
- Using the correct spanner or box wrench carefully and firmly tighten the collet nut or retaining mechanism.
- Check the pullstud with an open ended wrench and insure that it is snug within the Cat 40 tool holder
- Pressing and holding the ATC release button or black button on the head of the Haas insert the tool holder into the spindle making sure to align the spindle dogs with the tool holder before releasing the button.
Homing and Zeroing the machine:
Starting Job:
Machine Limitations
Choosing tools
Many tools are optimized for different materials, and although a 2 flute endmill can do most operations, it is not always ideal. Single and duel flute high helix endmills are available for plastics, woods, and composites, with carbide endmills and burs available for abrasive materials like glass fiber reinforced materials such as circuit boards. Feeds and speeds can be found HERE
File Types
G-Code files will be posted with the file extension .nc. G-code files can be opened directly into a text editor if necessary to preview or edit the desired code or opened within HSM-Works to send to a machine.
Test Part
Training will focus the machine set up and use, not directly on the CAM and its accompanying software HSM Works. Before training, please take a look at and try your hand at creating the CAM for this | test part. The software you write will be used to demonstrate you competence on the machine. Feel free to reach out at any time to the Workshop Wizard running the training course if you are having trouble creating the part G-code. Use the .step file to create the CAM, reference CAM is stored in the .SLDPRT file under the HSM workspace.
Haas Super Mini Mill Quick Review
Tool Lead: Andrew Furst
Contact: Andrewfurst@ucsb.edu
Safety Concerns
- Safety Glasses must be worn when machine is running
- The glass door must be closed before starting a job
- The spindle must be completely stopped before adjusting or removing work piece
- After milling is completed, the work piece will have developed sharp burrs which must be removed with a hand file or sandpaper
Operating Procedures Review
- Program tool paths using a SOLIDWORKS add-in
- Put tools in tool holders
- Set tool offsets using tool probe
- Set fixture offset(s) with touch probe (usually G54)
- Load program
- Check that tool numbers in program match tools in machine
- Check that appropriate fixture offset is loaded
- Load stock in the machine
- Proof the part (test the program with air cuts). One easy way to do this is to add a height to the G54 Z value sufficient to make sure that all cuts will be above the top of the part surface.
- Use rapid and feed override at the beginning of the program to make sure that the initial Z axis moves are safe. You can also use single block mode
- Keep your hand close to the emergency stop in case the program doesn’t do what you expect.
- Reset G54 to the correct value.
- Run the program for the first time - follow the precautions in step 10 to make sure that nothing unexpected happens. You can adjust the feed rate override as needed.
Post Processing
- Use a file to debur the part
Maintenance
- Tools should be wiped clear of chips or coolant using an acid brush
- The router should be vacuumed out after every operation and at the completion of each job
- Once a month the router should be moved and chips cleared from underneath machine body
- Twice a year the router should be partially disassembled, cleaned, and re-oiled
- Tool should undergo initial set up every time it is moved or lifted