
haas_mini_mill
This is an old revision of the document!
Table of Contents
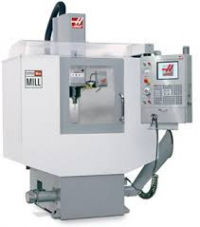
Haas Super Mini Mill
8/26/22 Haley Holcomb haleyholcomb@ucsb.edu
| Haas Super Mini Mill |
|---|
 |
| Tool Type: “CNC” |
| Location: “mFL 3430” |
| Supervisor | Tool Lead |
| David Bothman | David Bothman |
| (805) 893-4125 | (805) 893-4125 |
| bothman@cnsi.ucsb.edu | bothman@cnsi.ucsb.edu |
| Description: CNC milling machine |
| Manufacturer: Haas |
About
The Haas Super Mini Mill is a CNC milling machine. Parts can be modeled in SOLIDWORKS and then toolpaths are programmed through an HSM add-in that generates G-code for the machine to read. The Haas can read G-code and .EGC files.
Safety Concerns
- Safety Glasses must be worn when machine is running
- The glass doors must be in closed before starting a job
- The spindle must be completely stopped before adjusting or removing work piece or tool
- After milling is completed, the work piece will have developed sharp burrs which must be removed with a hand file or sandpaper
- Proof your program before running it. The first time you run it, slow the rapid speed and stay by the control panel. It is a good idea to use single block mode the first time you run your program.
Training Documentation
Detailed Specifications
406 x 305 x 254 mm, 40 taper, 15 hp vector drive, 10,000 rpm, 30.5 m/min rapids, high-speed 10-station automatic tool changer, coolant pump, power-failure detection module, 1 GB program memory, 15″ colour LCD monitor, USB port, memory lock keyswitch, and rigid tapping. Three-phase power only.
- X-axis: 16“
- Y-axis: 12”
- Z-axis: 10“
- Spindle nose to table: 14” max 4“ min
- Table length: 36”
- Work area length: 28.75“
- Width: 12”
- T-slot width: 12“
- T-slot center distance: 4.33”
- # T-slots: 3
- Max load on table: 500 lb
- Max spindle rating: 15 hp
- Max speed: 10,000 rpm
- Max torque: 17 ft-lb @ 4600 rpm
- Taper: 40
- Rapids: 1200 in/min
- Max cutting: 833 in/min
- Max thrust: 2000 lb
- Max tool diameter: 3.5“
Operating Procedures
- Program tool paths using a SOLIDWORKS add-in
- Put tools in tool holders
- Set tool offsets using tool probe
- Set fixture offset(s) with touch probe (usually G54)
- Load program
- Check that tool numbers in program match tools in machine
- Check that appropriate fixture offset is loaded
- Load stock in the machine
- Proof the part (test the program with air cuts). One easy way to do this is to add a height to the G54 Z value sufficient to make sure that all cuts will be above the top of the part surface.
- Use rapid and feed override at the beginning of the program to make sure that the initial Z axis moves are safe. You can also use single block mode
- Keep your hand close to the emergency stop in case the program doesn’t do what you expect.
- Reset G54 to the correct value.
- Run the program for the first time - follow the precautions in step 10 to make sure that nothing unexpected happens. You can adjust the feed rate override as needed.
Reference Documentation
haas_mini_mill.1672886061.txt.gz · Last modified: 2023/01/05 02:34 by haley